

VINTAGE STYLE OFFICE BOX FURNITURE
OFFICE WASHSTAND
FLOWER- AND BOOK-STAND
QUADRUPLE WRITING-DESK
KNICKKNACK BRACKET
OFFICE FILE
FIREPLACE
BOOKCASE
The chairs are not made of boxes.
Color Scheme:
Light oak.
Tan.
Olive green.
Woodwork:
Light oak
Furniture:
Light oak.
Walls:
Burlap in natural color, or with motif stenciled in olive
green.
Ceiling: Tan in lighter shade than the walls.
Hangings: Burlap in
olive green.
Curtains: Net in same color as hangings.
Floor: Stained light oak, with rugs of plain olive green
same color as walls.
Plants: Growing
plants with either crimson or orange-colored blossoms.
FLOWER STAND

Requirements:
Body.
1 Candle Box (about 7 in. deep, 12 in. square).
Legs.
4 Stripe 8/8 in. thick, 1 1/4 in. wide, and 9 in. longer
than the outside depth of the box. 4 Stripe 8/8 in. thick, 1 1/2 in. wide, and
9 in. longer than the outside depth of the box.
Cleats.
2 Stripe 1/2 in. thick, 1 1/2 in. wide and length equal to
the outside width of the box.
Construction:
Make the legs 9
inches longer than the outside depth of the box. Remove the cover carefully.
Nail a cleat across each end on the side presenting the worst appearance,
keeping the edge of the cleat even with the end of the cover. Turn the box on
its side and nail on the legs, keeping their upper ends even with the top of
the box. . The cover (with the cleats across the ends to keep it flat) is to be
the shelf; Turn the stand upside down and set the shelf in place between the
legs, keeping it 4 inches from the bottom of the legs. And nail through each
face of leg into its edges. The stand will be complete, ready for staining or
painting, as desired.
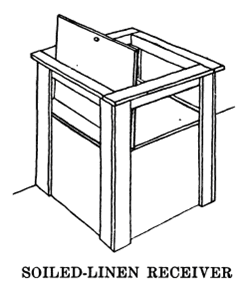
SOLID LINEN RECEIVER
Requirements:
Body.
1 Tee. Box (about 17 in. deep, 17 in. square).
Corner Trim.
4 Strips 1/2 in. thick, 1 1/2 in. wide, 4 in. longer than
the outside length of the box. 4 Strips 1/2 in. thick, 2 in. wide, 4 in. longer
than the outside length of the Box.
Braces.
2 Strips 1/2 in. thick, 1 1/2 in. wide, and length equal to
outside depth of the box. 2 Strips 1/2 in. thick, 1 1/2 in. wide, by 1 in.
shorter than the outside width of the box.
Facing Strips.
2 Strips 1/2 in. thick, 2 in. wide and length equal to
outside depth of the box. 2 Stripe 1/2 in. thick, 2 in. wide and length equal
to outside width of the box.
Cover.
1 Piece 1/2 in. thick, width equal to the outside depth of
the box, and length equal to the outside width of the box.
Hardware.
2 1 3/4 in. brass hinges
(butts) and screws. 1 porcelain pull-knob.
Construction:
Make the projecting corner trim 4 inches longer than the
outside length of the box. Remove one end. This may be done by striking on the
inside of the box gently and loosening the nails just enough so that they may
be drawn out. It is not necessary to take the box entirely apart. Nail the
loosened parts together again and stand the box with the open end up, and nail
the corner trim on. Nail the short braces to the inside face of the corner
trim, with their top edges even with the upper end of the projecting corner
trim. Do the same with the longer braces. Put the facing strips on top, flat
side down, allowing one end and the outside edge to project 1/2 inch over the
outside face of the corner trim all around. Make the cover in two parts, the
rear part being a strip 11/2 inch wide. Place this strip between the corner
trim on the rear top of the box, with its rear edge against the inner face of
the corner trim, and nail both ends and along the back edge. Hang the door to
the inner edge of this strip and screw the knob in place.
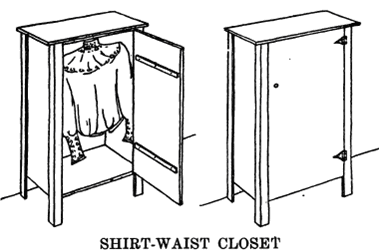
SHIRT WAIST CLOSET
Requirements:
Body
1 Packing Box (about
13 in. deep, 21 in. wide, 33 in. long).
Door.
Made from the cover of the box.
Door Cleats.
2 Strips 1/2 in. thick, 1 1/2 in. wide, 4 in. shorter than
the outside width of the box.
Top.
1 Piece 1/2 in. thick, 3 in. wider and 3 in. longer than the
outside width and depth of the box.
Legs.
4 Strips 1/2 in.
thick, 1 1/2 in. wide, 4 in. longer than the outside length of the box. 4
Stripe 1/2 in. thick, 2 in. wide, 4 in. longer than the outside length of the
box.
Hardware.
2 1 1/2 in. tee
hinges and screws. 1 porcelain pull- knob. 1 brass button and screw. 6 wire
hooks. 6 cont-hangers.
Construction:
Make the legs 4
inches longer than the outside length of the box. Remove the cover. Turn the
box on its side and nail on the legs. Fit the door, nail the cleats on, and
hang it, placing the hinges between the edges of the door and leg if desired.
Stand the closet on its legs and nail the top on, allowing it to project evenly
all around. Screw six hooks into the under face of the top at the center of the
closet, about 2 inches apart, and place a coat-hanger on each hook.
Notionette

This is a most convenient article where, in a limited space,
it is impossible to place a bureau. Two of these were used in a studio for two
years, one being used as above and the other as an annex to the desk.
Requirements:
Body.
1 Soap Box (about 8 in. deep, 13 1/4 in. wide, 27 8/4 in.
long).
Shelves.
5 Pieces 1/2 in. thick, width equal to the inside depth of
the box, and length equal to the inside width of the box.
Shelf Fronts.
5 Pieces 1/2 in. thick, 2 in. wide, and length equal to the
inside width of the box.
Door.
Made from the cover of the box.
Cleats.
2 Pieces, 8/8 in. thick, 1 1/2 in. wide, and 4 in. shorter
than the outside width of the box.
Corner Trim.
4 Strips 8/8 in. thick, 1 8/8 in. wide, and length equal to
the outside length of the box. 4 Stripe 8/8 in. thick, 1 8/4 in. wide and
length equal to the outside length of the box.
Top.
1 Piece 1/6 in. thick, 3 in. wider than the outside depth,
and 3 in. longer than the outside width of the box.
Hardware.
2 1 8/4 in. brass butts and screws. 1 porcelain
pull- knob. 1 brass button and screw.
Contraction:
Make the corner trim as long as the outside length of the
box. Remove the cover, and fit and nail in the shelves at such heights as seem
practical, using 1 inch brads driven from outside through into the edge of the
shelf. Place a shelf front across the front edge of each shelf, its edge up,
and fasten it with brads. -' Put the corner trim on and nail on the top,
allowing it to project evenly all around. Lay the notionette on its back, then
put the cleats on the doors and hang them, and screw on the pull knob and brass
button.

Requirements:
Body.
1 Packing Box (about 14 in. deep, 18 in. wide, 36 in. long).
Shelves.
2 Pieces 1/2 in. thick, Width equal to the inside depth of
the box, and length equal to the inside width of the box.
Doors.
Made from cover of box.
Hinged Top.
1 Piece 1/2 in. thick, 4 in. wider than the outside depth of
the box, and 4 in. longer than the outside width of the box.
Legs.
4 Stripe 1/2 in. thick, 1 1/2 in. wide, and 4 in. longer
than the outside length of the box. 4 Stripe 1/2 in. thick, 2 in. wide, and 4 in.
longer than the outside length of the box.
Cleats.
4 Stripe 1/2 in. thick, 1 in. wide, and length equal to the
width of the door.
Shelf Cleats.
4 Stripe 1/2 in. thick, 1 1/2 in. wide, and length equal to
the inside depth of the box.
Mirror.
1 flat-framed mirror.
Hardware.
1 pair 1 8/4 in. brass hinges (butts). 2 pairs 4 in. tee
hinges.
construction:
Make the legs 4 inches longer than the outside length of the
box. Remove the cover and one end from the box. Put on the shelf cleats at the
proper height to make room for the pail, pitcher, and bowl, leaving at least 1
inch, or more, between the top of the bowl and the under side of the hinged tap
to clear the mirror. ‘Fit and nail in the shelves. Lay the box on its side and
put on the legs. Turn it on its back and fit and hang the doors. The hinged top
will be made in two pieces, the being 6 inches piece on, letting the face of
the at the sides and wide piece of and place a front edge to closed. Secure the
under side narrow piece wide. Nail this it project
over legs 1 1/2 inches rear. Hang the lid to this, cleat under the hold the
doors the mirror to of the lid.
DESK CHAIR

The seat is formed of a box with a hinged cover. Midway of
the depth inside is a sliding shelf upon two cleats extending the length of the
box, which provides space for large paper sheets, drawings, etc.
Requirement:
Body.
1 Condensed-milk Box (about 7 1/4 in. deep, 13 in. wide, 19
8/4 in. long).
Cover.
1 Piece 5/8 in. thick, 1 1/2, in. wide, length equal to side
length of the box. 1 Piece 5/8 in. thick, width 1 1/2 in. less then the width
of the box, length equal to the outside length of the box.
Shelf.
1 Piece 1/2 in. thick, width equal to one half the in- side
length of the box, and length equal to the inside width of the box.
Cleats.
2 Pieces 1/2 in. thick, 1 1/2 in. wide, length equal to the
inside length of the box.
Legs.
4 Stripe 1/2 in. thick, 1 1/2 in. wide, 27 in. long. 4
Stripe 1/2 in. thick, 2 in. wide, 27 in. long.
Arms.
2 Stripe 1/2 in thick, 2 1/2 in. wide, 16 in. long.
Back Bar. 2 Strips 1/2
in. thick, 2 1/2 in. wide, 21 3/4 in. long.
Hardware. 2 1 3/4 in. brass butts.
Construction:
Make the legs 27 inches long. Remove the cover. Nail the shelf cleats on
the inside sides of the box, keeping the top of the cleats 3 inches from the
bottom. Fit the shelf so as to slide readily upon the cleats. Bore a hole 97.4
inch in diameter, % of an inch from the edge at the center; insert the finger in
this hole to move the shelf. Nail the narrow cover strip along the side on top,
keeping its outside edge even with the outside edge of the box. Turn the box on
its side and nail on the legs, allowing them to project 10 inches above the top
of the box with the seat cover on. Stand the chair upon its legs, right side
up. Nail the arms to the t0p of the legs. allowing their ends to project 2
inches over the face of the legs in front, and their outside edges to project
1/2 inch over the outside face of leg on the sides, the rear end of arm being
even with the rear face of the rear leg. Nail one of the back bar strips across
the rear legs, keeping its top edge even with the top of the leg. Set the other
back bar strip, flat side up, directly behind the arm ends, and nail to the
other half of back bar already in place. Fit and hang the seat and set the
shelf in place.
Leave a Comment