
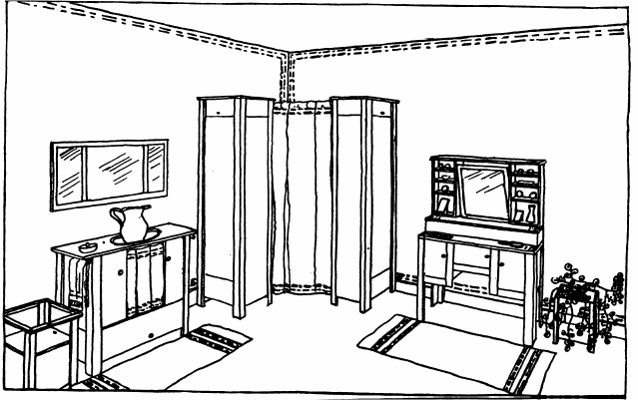
THE BEDROOM
SOILED LINEN RECEIVER
DOUBLE WARDROBE
PLANT STAND
WASH STAND
MIRROR FRAME
DRESSING-TABLE
Color Scheme:
Flemish oak (seal brown).
Old blue.
Woodwork:
Brown Flemish oak (stained).
Furniture :
Brown Flemish.
Walls:
Old blue (light), with
motif stenciled in some color as furniture.
Ceiling :
White.
Hangings:
Canvas in old blue, with motif stenciled in same color as on
the walls.
Curtains :
White muslin.
Floor :
Painted same color as furniture; rugs old blue and brown
predominating.
Plants: Growing
plants or cut flowers with white blossom
PHOTOGRAPHIC STAND

PHOTOGRAPHIC STAND
The projecting shelves may be used to hold the
printing-frames while making prints. The stand may also be used in the
invalid-room for medicines or bandages. When so used, growing plants or small
articles may be placed on the projecting shelves.
Requirements:
Body.
3 Butter Boxes (about 10 1/4 in. deep, 13 8/4 in. wide, 14
1/4, in. long).
Shelves.
3 Pieces the same thickness as the sides of the boxes, 12
in. longer than the outside width of the boxes.
Top. 1 Piece 3 in. longer than the end of the box each
way.
Door.
1 Piece 1/2 in. thick, 3 in. less in width than the outside width
of the box, 6 in. longer than twice the outside length of the box.
Door Cleats.
2 Strips 1/2 in. thick, 1 1/2 in. wide, 4 in. shorter than
the outside width of the box.
Legs.
4 Strips 1/2 in. thick, 1 1/2 in. wide, 12 in. longer than
twice the outside length of the box. 4 Strips 1/2 in. thick, 2 in. . wide, 12
in. longer than twice the outside length of the box.
Hardware.
2 3 in. tea hinges and screws. 1 porcelain pull-knob. 1
button.
Construction:
Make the legs. Remove the covers from all and one end from
two of the boxes. Midway the length of the box from which the cover only has
been removed, make a pencil line across the bottom and sides. Saw the box in
two, cutting on the line. Turn one half on its end, and across the sides place
one of the shelves, allowing its ends to project equally, each edge being 1 1/2
inches from the bottom face and open side edges of the box. Nail the shelf on
and cut from the covers two strips 1 1/2, inches wide, and length equal to the
inside width of the boxes, and nail them one on each side of the shelf. Cover
the open ends of the other two boxes in the same manner. Turn one of the large
boxes on the shelf. end and place the other large box on its shelf end upon it,
with the open compartments facing the same way. Match their edges and nail them
together. Do the same with the small box. Nail the top on, allowing it to
project equally all around. Turn all the boxes open side down upon the floor and
nail on the rear legs. Reverse and nail on the front legs. Nail the cleats on
the door, placing them about 4 inches from each end. Fit and hang the door,
placing the hinges about 6 inches from each end. Screw on the pull-knob and the
button.

REFERENCE STAND
Requirements:
Body.
3 Soap Boxes (about 10 8/4 in. deep, 14 1/4 in. wide, 20 in.
long).
Legs.
4 Strips 3/8 in. thick, 1 8/8 in. wide, 6 in. longer than
the outside length of the boxes. 4 Stripe 3/8 in. thick, 1 8/4 in. wide, 6 in.
longer than the outside length of the boxes.
Tops.
2 Pieces 1/2 in. thick, 2 in. wider than the outside depth of
the box with the cover removed, 2 in. longer than the outside width of the box.
Facing Strip Legs.
4 Strips 8/8 in. thick, 1 8/4 in. wide, 6 in. longer than
the outside length of the long boxes.
Construction:
Make the legs 6 inches longer than the length of the boxes.
Remove the covers from all and one end from each of two boxes. Use the removed
end of each of these boxes as a shelf for each. Stand these two boxes on their
closed ends and place and nail the shelves in them at a height to correspond
with the top side of the third box when the third box is placed on its side.
Stand the third box on end, and upon its upper end place one of the other two
boxes, both open compartments facing the same way. Set the end face of the first
box even with the outside face of the third box, match their edges, and nail
them together. Turn these two boxes upside down; place and nail the second box
to the other end of the third box in the same manner, having the open ends of
the first and second boxes facing the same way. Nail on the legs, two at each
end of the stand, keeping their upper ends even with the top edge of the end
sections of the stand. Turn the stand upon its legs and nail a top on each end
section, allowing the top to project 5/8 inch over the outside face of the legs
at the front, rear, and end. Nail on the facing strip legs, two on the front
and two at opposite points on the rear side, so placed that their edges will
project evenly over the abutting edges of the boxes.
CLOTH PRESS

CLOTH PRESS
This is similar in form and construction to the Reference
Stand, but is made with larger boxes, additional shelves, and a curtain.
Requirements:
Body. 1 Packing Box
(about 9 1/4 in. deep, 28 in. wide, 31 in. long). 2 Tobacco Boxes (about 9 1/4
in. deep, 13 8/4 in. wide, 37 in. long).
Tops.
2 Pieces 1/2, in. thick, 3 in. larger each way than the end
of the narrow boxes.
Shelves.
4 Pieces 1/2 in. thick, width equal to the inside depth of
the narrow box, and length equal to the inside length of the narrow box.
Legs.
4 Pieces 8/8 in.
thick, 1 8/8 in. wide, 4 in. longer than the narrow boxes. 4 Pieces 8/8 in. thick, 1 8/4 in. wide, 4 in.
longer than the narrow boxes.
Facing Strips.
4 Pieces 8/8 in. thick, 1 8/4 in. wide, 4 in. longer than
the narrow boxes.
Hardware.
1 brass rod or tube 1/4 in. in diameter, 1/2 in. longer than
the inside width of the wide box.
Curtain.
A suitable sliding curtain of any desired material or pattern.
Construction:
Make the legs 4
inches longer than the narrow boxes. Remove the covers from all and one end
from each of the narrow boxes. Use the removed end as shelf for each. Stand the
narrow boxes on their closed ends, and place and nail these shelves in them at
a height to correspond with the top side of the wide box, with the wide box-
placed on its end. Fit and nail in place a shelf near the other end of each of
the narrow boxes, having the
compartments at each end of the box the same in size. Lay
the wide box on its side and place one of the narrow boxes upon it, both open
compartments facing the same way. Set the end face of the narrow box even with
the outside end face of the wide box. Match their edges and nail them together.
Turn them upside down and nail the other narrow box to the other end of the
wide box in the same manner, having the open ends of the narrow boxes facing
the same way. Nail on the corner legs, two at each end of the stand, having
their upper ends even with the open ends of the boxes. Turn the stand upon its
legs, and place and nail a top on each end section, allowing the top to project
5/8 inch over the outside face of the legs at the front, rear, and end. Nail on
the facing strips, two on the front and two at opposite points on the rear
side, so placed that their edges will project evenly over the abutting edges of
the boxes.
Bore a hole 1/4 inch in diameter and 1/4 inch deep in the
inside side face of the wide compartment, 1 inch from the front face and 1 inch
from the under side of the top of the compartment Gouge a vertical slot 1/4
inch wide from one hole to the under side of the top of the compartment. Slip
the curtain upon the rod and insert one end of the rod in the first hole and
spring the other end through the slot into the second hole.
UMBRELLA STAND

UMBRELLA STAND
Requirements:
Body.
1 Grocery Packing Box (about 7 8/4 in. deep, 21 1/2 in.
wide, 31 1/2 in. long). 2 Shoe-polish Boxes (about 5 5/8 in. deep, 7 1/2 in. wide,
9 7/8 in. long).
Shelves.
2 Pieces 1/2 in. thick, width equal to the inside depth of
the box, length equal to the inside width of the box.
Corner Trim.
4 Strips 1/2 in.
thick, 1 1/4 in. wide, length equal to the outside length of the large box.
4 Stripe 1/2 in. thick, 1 8/4. in wide, length equal to the
outside length of the large box.
Vertical Facing Strips.
4 Strips 1/2 in.
thick, 2 in. wide, length equal to the outside length of the large box.
Top Facing Strips.
2 Strips 1/2 in. thick, 2 in. wide, 1 in. longer than twice
the outside length of the small box and the outside width of the large box
combined.
4 Stripe 1/2 in. thick, 2 in. wide, 1 in. longer than the
outside width of the large box.
Construction:
Make the legs as long as the outside length of the large
box. Remove the covers. Fit and nail the shelves in place, making one
compartment about 6 inches high, the other two being of equal height. The
shelves may be fastened with 1 1/4 inch brads driven through the side and
bottom of the box into the edges of the shelves. Turn the large box on its end
on the floor, the large compartment being at the lower end. Place one of the
small boxes on the floor against the side of the large box and nail them
together. Do the same with the other small box at the other side of the large
box. Nail the corner trim on the outer end of each small box, also two vertical
facing strips on both the front and the rear on the side edge of the large box.
Keep the inner edges of these strips even with the inside face of the side of
the large box and their upper ends even with the outside face of the top end.
Lay the long top facing strips, flat side down, across the front and rear edge
of the stand and nail them. Keep their ends even with the outside face of the
corner trim. Their outside edges are also to be even with the outside face of
the corner trim and vertical facing strips. Two inches back from each end of
these top facing strips make a saw-cut 1/4 inch deep and, with a chisel, cut
away the top half of the strip at this point. Do the same with each end of all
the short facing strips. Make two similar saw-cuts 2 inches apart across the
top of the long strips, in line with both edges of the four vertical facing
strips and cut away in like manner. Place all the short strips in place, the
uncut side up, and fit their ends into the recesses cut in the long strips and
nail them. These recesses are made and fit like those described for the Picture
Frame.
CHAFING DISH TABLE
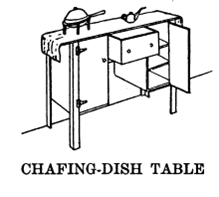
CHAFING DISH TABLE
There are two closets on the side and a drawer between. The
recess between the side closets is closed at the rear by a junction piece
extending 2 inches below the drawer. Each closet contains two shelves.
Requirements:
Body.
2 Canned-tomato Boxes (about 10 1/2 in. deep, 13 1/2 in.
wide, 18 1/2 in. long).
1 Canned-asparagus Box (about 8 1/4 in. deep, 12 in. wide,
14 1/2 in. long).
Doors.
2 Piece-1/2 in. thick, width 1 1/2 in. less than the closet
box, and length equal to the outside length of the closet box.
Top.
1 Piece 1/2 in. thick, 2 in. wider than the outside width of
the closet boxes, 3 in. longer than the outside length of the drawer box and
twice the outside depth of the closet boxes combined.
Shelves.
4 Pieces 1/2 in. thick, width equal to the outside depth of
the closet box, length equal to the inside width of the closet box.
Drawer Guides.
2 Strips 1/2 in. thick, 2 in. wide, length equal to side
width of the closet boxes.
Facing Stripe.
1 Strip 1/2 in. thick, 2 in. wide, length equal to the
outside length of the drawer box.
Beck Strips.
1 Piece 1/2 in. thick, 3 in. wider than the outside depth of
the drawer box, 3 in. shorter than the outside length of the drawer box and
twice the outside depth of the closet boxes combined.
Legs.
4 Strips 1/2 in. thick, 1 1/2 in. wide, 28 in. long. 4
Strips 1/2 in. thick, 2 in. wide, 28 in. long.
Hardware.
4 3 in. tee hinges
and screws. 4 pull-knobs. 2 small brass hooks and screws. 2 brass screw eyes.
Construction:
Make the legs 28 inches long. Remove one side from the boxes
which are to form the side closets and nail the cover down closely, then fit and
fasten in the shelves with brads driven from the outside of the box through
into the edges of the shelves, two shelves to each box. Place the drawer box
upon the floor. top side up, and remove the cover. Against each end of this box
place one of the closets on end, with the open fronts facing the same way.
Place the top across the tops of the closets, allowing its rear edge to project
1/2 inch over the back face of the closets and 1 1/2 inches over each end and
the front of the closets, and nail it to them. Turn all three boxes face down
on the floor, and move the drawer up against the under side of the top, and nail
the rear legs on the outside corners of the closets. Temporarily to hold the
rear legs the proper distance apart, place a light strip of wood across the
backs of them near their lower ends and fasten slightly to one leg, then draw
the legs together until they measure the same distance apart at the bottom as
at the top, and nail the strip to the other leg. Nail on the back strip,
placing its upper edge against the under side of the top. This back strip will
extend across the rear upper ends of both closets between the rear legs, its
outside face being even with the outside rear face of the legs. Remove the
temporary strips and turn the table upon its back, front side up. Fit the
drawer into place and fasten the drawer guides to the side of each closet for
the drawer to slide upon, and place a block at the back to prevent its going in
too far. Their ends should be even with the front face of the closets before
the door is hung. Put the front legs on and hang the doors. Put the temporary
strip across the lower ends of the front legs the same as for the back legs,
then, with both doors closed, fit the facing strip across the ends of the drawer
guides and between the closets under the drawer. The outer face of the facing
strip will be even with the outer faces of the drawer and the doors. Screw on
the knobs and place a small hook and eye just below the facing strip to keep
the doors closed. Remove the temporary strips and stand the table upon its
legs.

WASH STAND

WASH STAND
Requirements:
Body.
1 Butter Box (about 10 1/2 in. deep, 13 in. wide, 25 in.
long).
2 Condensed-milk Boxes (about 7 1/4 in. deep, 13 in. wide,
19 8/4 in. long).
Top.
1 Piece 5/8 in. thick, 7 in. longer and 2 in. wider than the
bottom of the box.
Door.
Made from the covers of the boxes.
Smell Shelves.
4 Pieces 1/2 in. thick, width equal to the inside width of
the box, and length equal to the inside depth of the box.
Large Shelf.
1 Piece 1/2 in. thick, about 13 in. wide, 10 1/2 in.
long.
Legs.
4 Stripe 1/2 in. thick, 1 1/4 in. wide, 31 in. long. 4
Stripe 1/2 in. thick, 1 8/4 in. wide, 31 in. long.
Towel Rods
2 Childs broom handles.
Curtain Rod.
1 Child’s broom handle.
Waterproof Cover.
1 Piece white
enameled oil-cloth, 3 in. wider and longer than the top.
Curtain.
1 Piece cloth, 8/4 yd. long.
Hardware.
1 package carpet tacks to fasten oil-cloth. 6 brass hinges.
4 brass curtain books for towel-rod hangers. 2 brass curtain hooks for
curtain-rod hangers. 2 small brass hooks and screw eyes for fastening the side
doors.
Construction:
Make the legs. Place the largest box with its side upon the
floor. Put the small boxes upright upon it, one at each end, with the faces even
at the end, and nail them to the lower box, driving the nails down through the
ends of the small boxes. Clinch them on the under side of the top of the bottom
box. Keep all the open compartments of the boxes to the front, and all the
faces even with each other.
Make the top of the washstand of two or more boards 7 inches
longer and 2 inches wider than the bottom box. Cut a circular hole in the
center of the top, suitable for the bowl which rests in it, allowing the edge
of the bowl to project about an inch above the top. Sandpaper and smooth the
edges of the hole. Then nail the top across the tops of the upper boxes, so
that the front edge will project 1 1/2 inches, the ends 3 1/2 inches each, and
the rear edge 1/2 inch beyond the boxes Make the shelves and fit them in place,
securing them with nails driven through the sides of the boxes. The shelf for
the waste-water pail should be placed so that the top of the nail will be 3
inches from the top of the washstand.
Nail the legs on the outside corners of the upright boxes, driving the
nails into the edges of the upper boxes. Make the doors and hang them. Put the
pull-knobs 2 inches from the edges, in the middle of the doors. When finished, the outer faces of the doors and the
legs will be even with each other.
Put on the brass hooks and screw in the eyes for fastening
the upper doors. The curtain pole is
made of a child’s broom handle cut to the proper length and held up by two brass
hooks screwed into the under side of the top. The towel racks at each end of
the washstand. are made of broom handles held by brass hooks placed 3 1/2
inches below the top of the stand. Cover
the top with the white enameled oil-cloth, stretched taut, turned under the
edges, and tacked underneath. For the bowl opening, cut a hole much smaller
than the opening and slit the edges, turning them back and tacking them on the
under side.

NURSERY TABLE

Four children may sit at the table while at play, each
having a shelved compartment to hold his toys. The table may be set at
meal-time for the little ones.
Requirements:
Body.
4 Soap Boxes (about 10 8/4 in. deep, 14 1/4, in. wide, 20
in. long).
Shelves.
12 Pieces 1/2 in. thick, width equal to the inside width of
the box, and length equal to the inside depth of the box.
Legs.
12 Pieces 3/8 in. thick, 1 8/8 in. wide, 2 in. longer than
the outside length of the box. 12 Pieces 8/8 in. thick, 1 8/4 in. wide, 2 in.
longer than the outside length of the box.
Top.
1 Piece 8/4 in. thick, octagon shape 42 in. across from side
to side
Construction:
Make the legs 2 inches longer than the outside length of the
box. Remove the covers. Fit and nail three shelves in each box, placing the
first one 6 inches from one end of the box, the next one 11 inches from the same
end, and divide the balance of the space equally with the third shelf., Fasten
the shelves with 1 1/4. inch wire brads driven from the outside through into
the ends of the shelves. Nail two legs on each box at the corners of the open
side, allowing them to project 2 inches over the end having the largest
compartment. Stand each box on its legs so placed as to form a hollow square in
the center, having the open sides face out. (See outline of the boxes in dotted
lines) Place a small block 2 inches high under the rear end of each

box to make it stand level. Move the boxes together until
the corners touch and match. Place the inner legs in a reverse position to fit
in each angle, and nail to both boxes forming the angle, using the try-square.
Make the top of octagon shape, 42 inches across from side to side. Use
seasoned, grooved and tongued material 3/4 inch thick, 7 inches wide, planed on both
sides. Draw the octagon full size on the floor. Divide the space across in six
equal spaces and draw the lines representing the boards as shown in Fig. Lay the boards between the lines and mark and
cut them to the proper angle. Place them across the tops of the boxes and nail
firmly, driving each tightly against the other, allowing each side edge to
project about 1 inch over the outside face of the legs. Set the nail-heads
slightly below the top surface, and then finish the top face with the smoothing-plane. If preferable, the boards
forming the top may be joined with hot glue instead of the groove-and-tongue
joint, but the edges must be held tightly together about thirty-six hours, or
until the glue becomes hard, before nailing the top in place.
Leave a Comment