

furniture types
TWIN-BED TABLE
VASE WALL BRACKETS
TRIPLE-MIRROR DRESSING-TABLE AND CHAIR
" SHAVINGETTE "
COMBINATION WASH-STAND AND WARDROBE
BOOKCASE DESK
OBLONG CLOCK
The desk chair is not made from boxes.
Color Scheme :
Gray (dark and light).
White.
Woodwork:
Neutral gray (paint)
Furniture:
Neutral gray, with motif stenciled in white.
WallS:
Neutral gray, with motif stenciled in white and
old rose, or white and lavender.
Ceiling:
White.
Hangings and Bed Coverings :
French gray colored linen, with motif
or embroidered same color as stencil on wall
Curtains:
White muslin.
Floor:
Painted gray; rugs light and dark gray with
shade of old rose or lavender in the border.
Plants:
Cut flowers or growing plants with either old
rose, lavender, or white blossoms.
FOOTSTOOL

Requirements:
Body. 1 Roach-food Box (about 5 in. deep, 10 in. square).
Top. 1 Piece 8/4 in. thick, square 2 in. greater than the box.
Legs. 4 Pieces 8/8 in. thick, 1 8/8 in. wide, 6 1/2 in. long. 4 Pieces
8/8 in. thick, 1 8/4, in. wide, 6 1/2 in. long.
Construction:
Make the legs 61/2 inches long and round off the cor-
ners of one end of each leg, otherwise the constant mov-
ing about of the stool will have a tendency to split of the
sharp corners.
Remove the cover. Turn the box upside down and
nail a leg on each corner and clinch the nails on the
inside. .
Invert the box, set it upon the legs, and place the false
top on it, allowing an even projection on each side, and
nail it securely near the edges.
Note 1. The stool by the bedside in the Nursery In-
terior is an inverted box on legs similar to the footstool,
the legs being longer and the box of less depth than the
footstool.
Note 2. The stools in the Club-room Interior are
made the same, with supports at the base.
COAL OR PAPER-BOX

Requirements:
Body. 1 Small Packing Box (about 14 in. deep, 16 in. wide,
27 in. long).
Cover. 1 Piece 1/2 in. thick, 3 in. wider than the width of the
box, 3 in. longer than the length of the box (outside measure-
ments).
Cleats. 2 Stripe 1/2 in. thick, 2 in. wide, and the length 2 in.
shorter than the inside width of the box.
Hardware. 1 Pair of 2 in. iron hinges (butts) with screws 8/8
in. long.
Legs. 4 Stripe 1/2 in. thick, 1 1/2 in. wide, 4 in. longer than the
depth of the box. 4 Strips 95 in. thick, 2 in. wide, 4 in. longer
than the depth of the box. _
Hinge-strip. 1 Strip 1/2 in. thick, 2 in. wide, 3 in. shorter than
the outside length of the box.
Construction:
Make the legs 4 inches longer than the depth of the
box with the cover removed. Remove the cover. Turn
the box on its side and place and secure the front legs on
the corners. Reverse the position of the box and put the
rear legs on, keeping the tops of all the legs even with
the top of the box. Clinch the nails on the inside of the
box. Make the cover 3 inches wider and 3 inches longer
than the outside width and length of the box. If made
of two widths of board, plane the edges straight and
true, butt tightly together, and place and nail the cleats
on the under side. Place each cleat about 4 inches from
the end of the cover. Drive the nails from the outside
through the cleats and clinch them on the under side.
Put the hinge-strip on the back of the box between the
legs, keeping its top edge even with the top edge of the
back of the box. Set the cover in place, with an even
projection all around. Place the hinges so one half can
be screwed to the under side of the projecting back edge
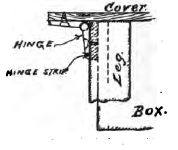 of the cover, and the other
half to the hinge-strip on the
back of the box,
thus:
thus:
The hinges may be set
about 6 inches from each end
of the box. Sandpaper and
fill imperfections, and color
as desired.
BLACKING-BOX

Requirements:
Body. 1 Butter Box (about 5 8/4 in. deep, 13 8/4, in. wide, 14 1/4 in.
long).
Top. Two Pieces 1/2 in. thick, 1 1/2 in. wider than one half the
outside width of the box, by 3 in. longer than the outside length of
the box.
Legs. 4 Strips 8/8 in. thick, 1 8/8 in. wide, by 7 in. longer than
the outside depth of the box. 4 Strips 8/8 in. thick, 1 8/8 in. wide, by
7 in. longer than the outside depth of the box.
Bole Block. 1 Block 2 in. thick, shaped like the sole of a shoe.
Hardware. 2 1 1/2 in. hinges (butts) and screws.
Construction:
Make the legs 7 inches longer than the outside depth
of the box. Remove the cover. Turn the box on end and
nail on the legs. Stand it right side up on the legs; nail
on one half the cover, allowing it to project evenly on the
side and ends: Hang the other half of cover, placing
the hinges in the joint between each half cover. Cut the
edges of each half cover to let the hinges in even. Nail
the sole block on the under side of the hinged half of the
cover, and turn this hinged half over on the fixed half
when it is necessary to place the foot on the sole block.
OBLONG CLOCK CASE

Requirements:
Body. 1 Gelatin Box (about 4 in. deep, 8 in. wide, 10 in. long).
Top. 1 Piece 1/2 in. thick, 2 in. wider than the outside depth of
the box, 2 in. longer than the length of the box outside.
Legs. 4 Strips 1/4 in. thick, 1 in. wide, 1 1/2 in. longer than the’
width of the box outside. 4 Strips 1/4 in. thick, 1 1/4, in. wide, 1 1/2
in. longer than the width of the box outside.
Hardware. 2 7/8, in. brass hinges (butts) and screws. 1 brass
hook, screw-eye, and screw.
Construction:
Make the legs 1 1/2 inches longer than the width of the
box. Remove the cover. Place the box on its side and
nail the top in place, allowing it to project 1 inch all
around. Secure the legs on each corner. With the key-
hole-saw cut a circular opening in the center of the
bottom of the box, which is now to become the face of the
Clock Case. This opening is to be made of a diameter
to fit the face of the clock. Measure the clock face and
with a pair of dividers inscribe a circle as a guide. Cut
the opening a little smaller than desired. Sandpaper
smooth the edges of the hole to the correct size. From
the cover removed, make a door to fit the space between
the legs and lower edge of the case to the under side
of the top. Hang it on the hinges and use hook and screw-
eye to fasten it. Set the clock in place and, if necessary,
place a small block on the bottom inside for supporting
at the right level.
This is especially adapted for the ordinary American
alarm-clock, which is sold at a very low price.
UPRIGHT CLOCK CASE

Requirements:
Body. 1 Gelatin Box (about 4 in. deep, 8 in. wide, 10 in. long).
Top. 1 Piece 99 in. thick, 2 in. wider than the outside depth of
the box, 2 in. longer than the outside width of the box.
Legs. 4 Strips 1,4 in. thick, 1 in. wide, 2 in. longer than the
outside length of the box. 4 strips 5/. in. thick, 1%, in. wide, 2 in.
longer than the outside length of the box.
Hardware. 2 '95 in. brass hinges (butts) and screws. 1 brass
hook, screw—eye, and screw.
Construction:
Make the legs 2 inches longer than the outside length
of the box. Remove the cover. Place the box on its end
and nail the top in place, allowing its edges to project
evenly about 1 inch all around. Invert the box, turning
the other end up, and nail on the legs. Measure the
diameter of the face of the clock to be used, and, with the
dividers, inscribe a circle 14 inch smaller in diameter
on the original bottom of the box, which is now to be
the face of the clock case, placing the center of the
circle 6 inches from the lower end of the case. With a
keyhole-saw cut around on the circle. Sandpaper smooth
the edges of the hole to the correct size. From the cover
removed, make a door to lit the case between the legs on
the back, keeping the outer face of the door and the
outer face of the legs even. Hang the door upon the
hinges and screw on the hook and eye to fasten it. Set
the clock in place and put a small shelf or block under it
to support it at the right level.
NURSERY CLOCK CASE
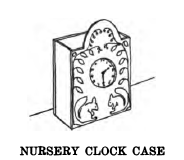
Requirements:
Body. 1 Extract of Beef Box (about 3 1/2 in. deep, 7 1/4 in. wide,
9 in. long).
One Shelf. 1 Piece 8/8 in. thick, width and length to fit inside
the box.
Construction:
Remove the cover and one end. Make a cover 11
inches long from a portion of another box. Five and
three quarter inches from one end on the center line of
the cover will be the center for the hole which is to be
cut that the clock dial may be seen. With a pair of
dividers inscribe a circle to suit the size of the face of
the clock and bore a hole, about 1/2 inch in diameter, in-
side the circle. The outer edge of the hole should be
on the circle line. Insert the keyhole-saw in the small
opening and cut on the line of the circle completely
around, and sandpaper true and smooth the edges after
the circular piece is removed. Eight and a half inches
from the same end and on the center line of the cover
will be the radius point for the arch. Set the dividers
2 1/2 inches open and describe the arch line, which is
slightly less than a semicircle. Mark the length of the
box on each side edge of the cover, and cut from that
point to the arch line. With the keyhole-saw cut
around on the arch line. Fit the shelf in the box at the
proper height to suit the clock, which will stand upon
the shelf inside the clock case. Nail on the cover with
the open end of the clock case at the top. Set the clock
upon the shelf through the open top end of the case.
The face of the clock case can be made quite a pleasing
feature by the use of an appropriate design.
Leave a Comment